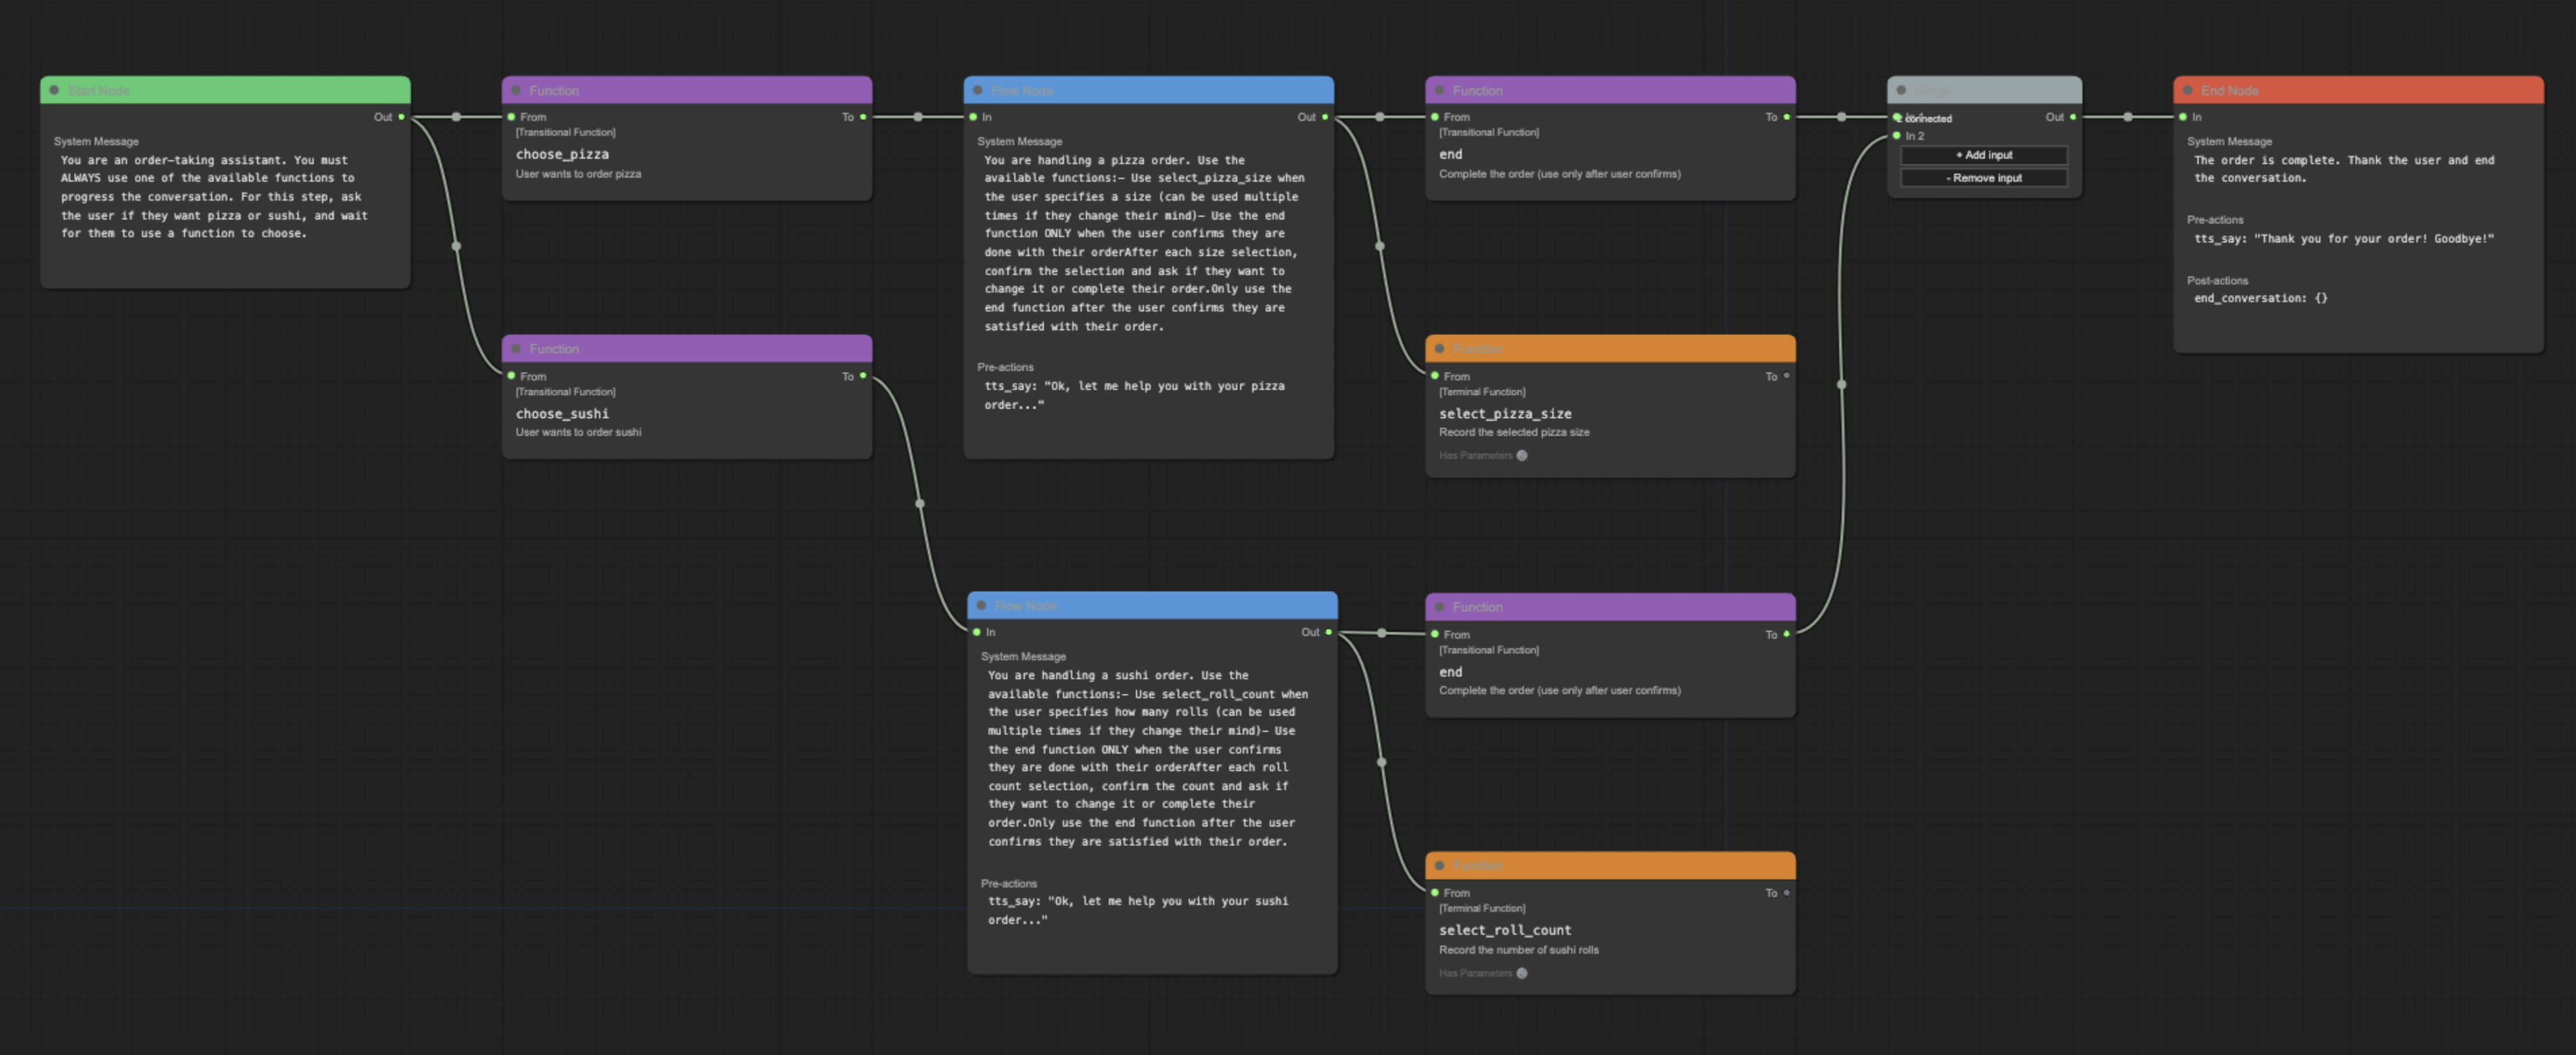
Pipecat's conversation flow system allows you to create structured, multi-turn conversations by defining your flow in JSON and processing it through the FlowManager. The system treats conversations as a series of connected nodes, where each node represents a distinct state with specific behaviors and options.
Pipecat Flows is comprised of:
- A python module for building conversation flows with Pipecat
- A visual editor for visualizing conversations and exporting into flow_configs
To learn more about building with Pipecat Flows, check out the guide.
A Python package for managing conversation flows in Pipecat applications.
If you're already using Pipecat:
pip install pipecat-ai-flowsIf you're starting fresh:
# Basic installation
pip install pipecat-ai-flows

# Install Pipecat with required options
# For example, to use Daily, OpenAI, and Deepgram:
pip install "pipecat-ai[daily, openai,deepgram]"
Learn more about the available options with Pipecat.
from pipecat_flows import FlowManager  # When developing with the repository
# or
from pipecat.flows import FlowManager  # When installed via pip

# Initialize context and tools
initial_tools = flow_config["nodes"]["start"]["functions"]  # Available functions for starting state
context = OpenAILLMContext(messages, initial_tools)        # Create LLM context with initial state
context_aggregator = llm.create_context_aggregator(context)

# Create your pipeline: No new processors are required
pipeline = Pipeline(
    [
        transport.input(),               # Transport user input
        stt,                             # STT
        context_aggregator.user(),  # User responses
        llm,                             # LLM
        tts,                             # TTS
        transport.output(),              # Transport bot output
        context_aggregator.assistant(),  # Assistant spoken responses
    ]
)

# Create the Pipecat task
task = PipelineTask(pipeline, PipelineParams(allow_interruptions=True))

# Initialize flow management
flow_manager = FlowManager(flow_config, task, llm, tts)  # Create flow manager

# Initialize with starting messages
@transport.event_handler("on_first_participant_joined")
async def on_first_participant_joined(transport, participant):
    await transport.capture_participant_transcription(participant["id"])
    # Initialize the flow processor
    await flow_manager.initialize(messages)
    # Kick off the conversation using the context aggregator
await task.queue_frames([context_aggregator.user().get_context_frame()])The repository includes several complete example implementations in the examples/ directory:
food_ordering.py- A restaurant order flow demonstrating node and edge functionsmovie_booking.py- A movie ticket booking system with date-based branchingmovie_explorer.py- Movie information bot demonstrating real API integration with TMDBmovie_explorer_anthropic.py- Themovie_explorer.pyexample but using an Anthropic LLMmovie_explorer_gemini.py- Themovie_explorer.pyexample but using a Google Gemini LLMpatient_intake.py- A medical intake system showing complex state managementrestaurant_reservation.py- A reservation system with availability checkingtravel_planner.py- A vacation planning assistant with parallel pathstravel_planner_gemini.py- Thetravel_planner.pyexample but using a Google Gemini LLM
Each LLM provider (OpenAI, Anthropic, Google) has slightly different function calling formats, but Pipecat Flows handles these differences internally while maintaining a consistent API for developers.
To run these examples:
-
Setup Virtual Environment (recommended):
python3 -m venv venv source venv/bin/activate -
Installation:
Install the package in development mode:
pip install -e .Install Pipecat with required options for examples:
pip install "pipecat-ai[daily,openai,deepgram,silero,examples]"If you're running Google or Anthropic examples, you will need to update the installed options. For example:
# Install Google Gemini
pip install "pipecat-ai[daily,google,deepgram,silero,examples]"
# Install Anthropic
pip install "pipecat-ai[daily,anthropic,deepgram,silero,examples]"
-
Configuration:
Copy
env.exampleto.envin the examples directory:cp env.example .env
Add your API keys and configuration:
- DEEPGRAM_API_KEY
- OPENAI_API_KEY
- ANTHROPIC_API_KEY
- DAILY_API_KEY
Looking for a Daily API key and room URL? Sign up on the Daily Dashboard.
-
Running:
python examples/food_ordering.py -u YOUR_DAILY_ROOM_URL
The package includes a comprehensive test suite covering the core functionality.
-
Create Virtual Environment:
python3 -m venv venv
source venv/bin/activate  # On Windows: venv\Scripts\activate
-
Install Test Dependencies:
pip install -r dev-requirements.txt -r test-requirements.txt
pip install "pipecat-ai[google,openai,anthropic]"
pip install -e .
Run all tests:
pytest tests/Run specific test file:
pytest tests/test_state.pyRun specific test:
pytest tests/test_state.py -k test_initializationRun with coverage report:
pytest tests/ --cov=pipecat_flowsA visual editor for creating and managing Pipecat conversation flows.
- Visual flow creation and editing
- Import/export of flow configurations
- Support for node and edge functions
- Merge node support for complex flows
- Real-time validation
While the underlying system is flexible with node naming, the editor follows these conventions for clarity:
- Start Node: Named after your initial conversation state (e.g., "greeting", "welcome")
- End Node: Conventionally named "end" for clarity, though other names are supported
- Flow Nodes: Named to reflect their purpose in the conversation (e.g., "get_time", "confirm_order")
These conventions help maintain readable and maintainable flows while preserving technical flexibility.
The editor is available online at flows.pipecat.ai.
- Node.js (v14 or higher)
- npm (v6 or higher)
Clone the repository
git clone [email protected]:pipecat-ai/pipecat-flows.gitNavigate to project directory
cd pipecat-flows/editorInstall dependencies
npm installStart development server
npm run devOpen the page in your browser: http://localhost:5173.
- Create a new flow using the toolbar buttons
- Add nodes by right-clicking in the canvas
- Start nodes can have descriptive names (e.g., "greeting")
- End nodes are conventionally named "end"
- Connect nodes by dragging from outputs to inputs
- Edit node properties in the side panel
- Export your flow configuration using the toolbar
The editor/examples/ directory contains sample flow configurations:
food_ordering.jsonmovie_booking.jsonmovie_explorer.pypatient_intake.jsonrestaurant_reservation.jsontravel_planner.json
To use an example:
- Open the editor
- Click "Import Flow"
- Select an example JSON file
See the examples directory for the complete files and documentation.
npm start- Start production servernpm run dev- Start development servernpm run build- Build for productionnpm run preview- Preview production build locallynpm run preview:prod- Preview production build with base pathnpm run lint- Check for linting issuesnpm run lint:fix- Fix linting issuesnpm run format- Format code with Prettiernpm run format:check- Check code formattingnpm run docs- Generate documentationnpm run docs:serve- Serve documentation locally
The Pipecat Flows Editor project uses JSDoc for documentation. To generate and view the documentation:
Generate documentation:
npm run docsServe documentation locally:
npm run docs:serveView in browser by opening: http://localhost:8080
We welcome contributions from the community! Whether you're fixing bugs, improving documentation, or adding new features, here's how you can help:
- Found a bug? Open an issue
- Have a feature idea? Start a discussion
- Want to contribute code? Check our CONTRIBUTING.md guide
- Documentation improvements? Docs PRs are always welcome
Before submitting a pull request, please check existing issues and PRs to avoid duplicates.
We aim to review all contributions promptly and provide constructive feedback to help get your changes merged.


