Deploy custom push protections and policies
on top of Git
npm install @finos/git-proxy
Docs
·
Report a bug
·
Suggest a new feature
Git Proxy deploys custom push protections and policies on top of Git. It is a highly configurable framework allowing developers and organizations to enforce push protections relevant to their developer workflow, security posture and risk appetite.
Git Proxy is built with a developer-first mindset. By presenting simple-to-follow remediation instructions in the CLI/Terminal, it minimises the friction of use and adoption, and keeps developers focused on what matters; committing and pushing code.
To install Git Proxy, you must first install Node.js. Then, use the npm package manager:
npm install -g @finos/git-proxyTo install a specific version of Git Proxy, append the version to the end of the install command:
npm install -g @finos/[email protected]Once you have followed the installation steps, run Git Proxy with:
git-proxyAlternatively, if you prefer the magic of npx over npm, you can run Git Proxy with:
npx --package=@finos/[email protected] -- git-proxy # No installation required...Create a proxy.config.json in a workspace with the following:
{
    "authorisedList": [
    {
      "project": "<YOUR-GITHUB-USERNAME>",
      "name": "git-proxy",
      "url": "https://github.com/<YOUR-GITHUB-USERNAME>/git-proxy.git"
    }
  ],
}
Then run Git Proxy and load your proxy.config.json configuration file from your workspace:
npx --package=@finos/[email protected] -- git-proxy --config ./proxy.config.jsonGit Proxy sits between the local clone of your repository and its remote upstream. Essentially, instead of communicating directly with the live version of your repository, you configure your local clone to speak with Git Proxy first.
For demonstration purposes, we recommend 👉 forking Git Proxy and cloning the repository to your PC:
git clone https://github.com/<YOUR-GITHUB-USERNAME>/git-proxy.gitPretty meta, huh? Testing Git Proxy on Git Proxy...
Navigate into your test-bed repository on your PC:
cd ./git-proxyBy default the clone of your repository will communicate with GitHub. To change this, so that your local copy of the repository speaks with Git Proxy, run:
git remote set-url origin http://localhost:8000/<YOUR-GITHUB-USERNAME>/git-proxy.gitOpen up the README.md and turn this frown upside-down:
Once you've cheered up our friend above, run:
git add README.md
git commit -m "fix: turn frown upside-down"git pushGit Proxy will prompt the entry of your git credentials. These credentials are your GitHub username and a Personal Access Token. For the ability to push and pull code through Git Proxy, you will only require the public_repo scope.
Git Proxy will reprompt you for credentials each time you push. To automatically re-use your credentials, you can run:
git config --global credential.helper osxkeychain # MacOS

git config --global credential.helper manager # Windows

git config --global credential.helper store # LinuxImmediately after a push, you should receive the following message in your terminal:
remote:
remote: Git Proxy has received your push:
remote:
remote: http://localhost:8080/requests/000000__b12557
remote:By default, Git Proxy ships with an out-of-the-box configuration.
To customise your Git Proxy configuration, create a proxy.config.json in your directory.
To specify a different file name for your Git Proxy configuration, use:
git-proxy --config ./config.jsonOr with npx:
npx -- @finos/git-proxy --config ./config.jsonTo check that your Git Proxy configuration is valid, run:
git-proxy --validateTo validate your configuration at a custom file location, run:
git-proxy --validate --config ./config.jsonYour contributions are at the core of making this a true open source project. Any contributions you make are greatly appreciated.
Click on the fork button at the top of the page. This will create a copy of this repository under your GitHub account.
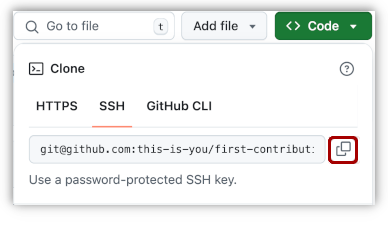
Clone the repository to your machine. Go to the repository via your GitHub account and click on the Code button.
Run the following command in your CLI/Terminal:
git clone https://github.com/YOUR_GITHUB_USRERNAME/git-proxy.gitYou can start coding on the default branch on your fork of the project, commonly master or main. If you want to create a branch to clearly identify your work, run:
git checkout -b feature/name-of-the-feature-you-are-creatingThis part is up to you. Be creative and write some magical code! 🧙🪄
Once you have finished making all of your improvements and changes, run the following:
git commit -m "YOUR COMMIT MESSAGE"Now that you've created a commit with your changes, it's time to push to GitHub:
git pushWith your changes applied to your fork of the project, it's time to open a pull request from your repository...
If you identify a security vulnerability in the codebase, please follow the steps in SECURITY.md. This includes logic-based vulnerabilities and sensitive information or secrets found in code.
We are committed to making open source an enjoyable and respectful experience for our community. See CODE_OF_CONDUCT for more information.
This project is distributed under the Apache-2.0 license. See LICENSE for more information.
If you have a query or require support with this project, raise an issue. Otherwise, reach out to [email protected].


